


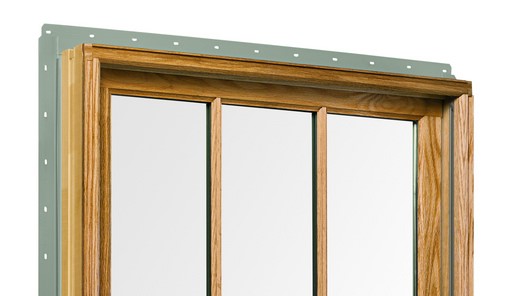

The most prevalent of all window types is the residential grade window with a nailing fin. While the most prevalent, many engineers, architects, and general contractors lack an understanding of how to properly flash this type of window. Here are some tips and industry standards to watch for in your next residential finned window flashing installation.
Window Flashing Basics
The “Building Envelope” is the term used for the exterior of the building. You can think of it as the shell that keeps rain and outside air out of the building. All habitable buildings have windows as part of the building envelope, which bring natural light into a space and provide views to the exterior environment. Unfortunately, providing windows means putting “holes” in your exterior wall, and like any penetration in the building envelope, these holes can leak if not installed properly.
The proper installation of windows is key to ensuring that the wall performs as intended for building owners. As such, if there are any errors in installing the windows and associated window flashings, the building is vulnerable to water infiltration. As is commonly known, water infiltration can result in damage to the structural framing, insulation, interior finishes, and can also result in mold and poor indoor air quality.
There are obviously a variety of window types. We’re going to focus on the most prevalent of windows: the residential finned window installed in low rise buildings.
What does it mean to flash a window?
First off, let’s understand one thing that can be confusing to many: the word “flashing” is used in the industry as both a noun and a verb. Flashing as a noun refers to the strips of membrane applied to the perimeter of the window. Flashing as a verb is the act of placing those strips of membrane around the window with the intent of keeping water out of the building. Therefore, we use flashing when flashing a window.
Those reading this article with generally no prior knowledge of what it means to “flash a window” should have this as a take away:
Residential finned windows typically have strips of flexible membrane material (called window flashing) placed at the bottom (“sill”), sides (“jambs”), and top (“head”) of the window. In order to provide a water-tight assembly, these strips of flashing must properly integrate with the window’s nail fin, and also properly integrate with the weather resistive barrier (“WRB”; i.e. “building paper”, “house wrap”, etc.) used behind the exterior cladding material. Sealants are also incorporated in the installation of the window to keep water out of the wall, which will be described below.
When trying to remember the sequence of installation for window flashing, just remember: Bottom, Side, Top. Now, let’s dive a little deeper into the actual process of flashing a window:
- The Rough opening: The “rough opening” is the term used for the opening in the wall framing into which the window will be placed. The rough opening is typically about 1/2-inch larger in height and width than the window frame; leaving about a 1/4-inch gap around the perimeter of the window. This allows for a little building movement without cracking the window frame.
- Sill Flashing: Typically, 9-inch wide strips of “flashing” are used to flash a window. Prior to the window being set into place, a strip of window flashing is attached along the bottom of the rough opening; in terms of overall length of the flashing, the window flashing should extend about 9 inches beyond the left and right sides of the rough opening (i.e. the width of the jamb flashing). The window flashing is stapled into place along its upper most edge, immediately below the window opening; the rest of the window flashing should be kept loose to be integrated with the WRB (weather resistant barrier) at a later time.
- Setting window in place: A bead of caulking is placed at the interior side of the window’s nail fin, at the jambs and head (not sill). Upon setting the window into the rough opening, the caulking should be seen bleeding out of the pre-punched fastener holes in the nail fin to ensure adequate coverage. Shims are added along the sill and jambs of the window to make sure the window is level and square, and the window is fastened in place per the manufacturer’s instructions. Care should be taken to not fasten the window within close proximity of the frame corners, else risk cracking the window fin or frame. Nailing requirements for the window head can depend on the span of the opening and how much deflection is anticipated in the structural member (“header”) above the window.
- Jamb flashing: When you read the standards referenced above, you’ll see that there are actually a few ways you can flash a window. Jamb flashing can be installed prior to the window being set in the rough opening (whereby the nail fin is placed over the jamb flashing), or the jamb flashing can be installed after the window is placed (whereby the jamb flashing is covering the nail fin). If installing the jamb flashing after the window is set in place, then the flashing is sealed to the fin using sealant or simply by using a self-adhered membrane flashing (the latter of which has become the norm). The bottom edge of the jamb flashing at each side of the window should extend down below the window enough to cover the sill flashing and extend about 9 inches above the window.
- Head flashing: The most important thing to remember about installing the head flashing is to make sure that it laps over the nail fin, and not behind the nail fin. That requirement is fairly easy to ensure as long as the window is installed before the head flashing is put into place. The head flashing extends to the left and right sides of the window opening enough to cover the jamb flashing.
- Integrating the flashing with the WRB: The WRB can be installed before or after the window is installed. The WRB application begins at the bottom of the wall. When the WRB application reaches the window, the WRB is lapped behind the sill flashing. The WRB can then be lapped either behind the jamb flashing or over it. Finally, the WRB should be lapped over the top of the head flashing.
What is the most common reason for a window installation to leak?
Two words: Reverse Lap. Improperly lapping the window flashing segments with the window’s nail fin, or with other window flashing segments, or with the WRB, can ultimately lead to water intrusion. Generally speaking, if you can see the uppermost edge of a window flashing piece or WRB, it’s likely considered a reverse lap condition.
What are the relevant building codes and standards?
As with any construction assembly, designers and builders should understand what building codes apply, what relevant industry standards exist, and what the manufacturer’s installation instructions say. With windows, building codes generally do not give step-by-step instructions on how to make a window water-tight. Codes relevant to exterior walls are mostly “performance” based, and simply indicate that “exterior walls shall provide the building with a weather-resistant exterior wall envelope”, which shall include “flashing” [1], and that flashing shall be installed at perimeters of doors in windows [2]. The code also states that windows shall be installed per the manufacturer’s installation instructions.
As one can see, the code requires three things:
- Make the wall weather-tight
- Use window flashing
- Follow the manufacturer’s instructions.
Manufacturer installation instructions, which are included with each window purchased (and also typically found on the manufacturer’s website) provide step-by-step instructions on how to install their window product. The instructions are kept simple for ease of installation. Such instructions are often consistent with industry standard methods for window flashing methodologies.
Beyond the manufacturer’s installation instructions, there are two industry standards that designers and builders should be familiar with. These are:
- ASTM E2112 – 07 (Reapproved 2016), Standard Practice for Installation of Exterior Windows, Doors and Skylights;
- The American Architectural Manufacturers Associatio (AAMA) 2400-10, Standard Practice for Installation of Windows with a Mounting Flange in Open Stud Frame Construction for Low Wind/Water Exposure.
These two standards provide a comprehensive set of instructions for installing residential finned windows in low rise buildings, no matter which window manufacturer is used. While there are a variety of other ways and various other materials that can be incorporated, such as sill pan flashings, fluid applied WRB and flashing, head metal flashing, and various proprietary products, the same principles will always apply.
To learn more about VERTEX’s Construction Consulting services or to speak with a Construction Expert, call 888.298.5162 or submit an inquiry.
Reference
- [1] IBC 1403.2 Weather Protection
- [2] IBC 1405.4 Flashing